Welcome to the Loans app project tutorial!
In this tutorial, you will build an example loans application using many of the techniques you learned in earlier tutorials
Topics covered in this tutorial
- Loans Smart Contract
- Module and Keyset
- Define Schemas
- Define Tables
- Define Consts
- Define Functions
- Create Tables
- Deploy Smart Contract
The goal of this tutorial is to ensure you understand the building blocks of Pact applications, eventually navigating you toward building more complex applications. It’s also meant to push you toward solving problems that you may not have seen before to build valuable new applications.
Key Takeaway
Loan creation and management is an excellent use case of Pact smart contracts. By combining what you know about modules, schemas, tables, and functions in new ways, you can already build useful and simple applications for complex problems.
Loans Smart Contract
Throughout this tutorial, you’ll get hands on and build a smart contract used to create, distribute, and manage loans.
This smart contract uses schemas and tables pretty extensively and will give you great experience setting up tables as well as writing many different functions that can be used to create and manipulate data within these tables.
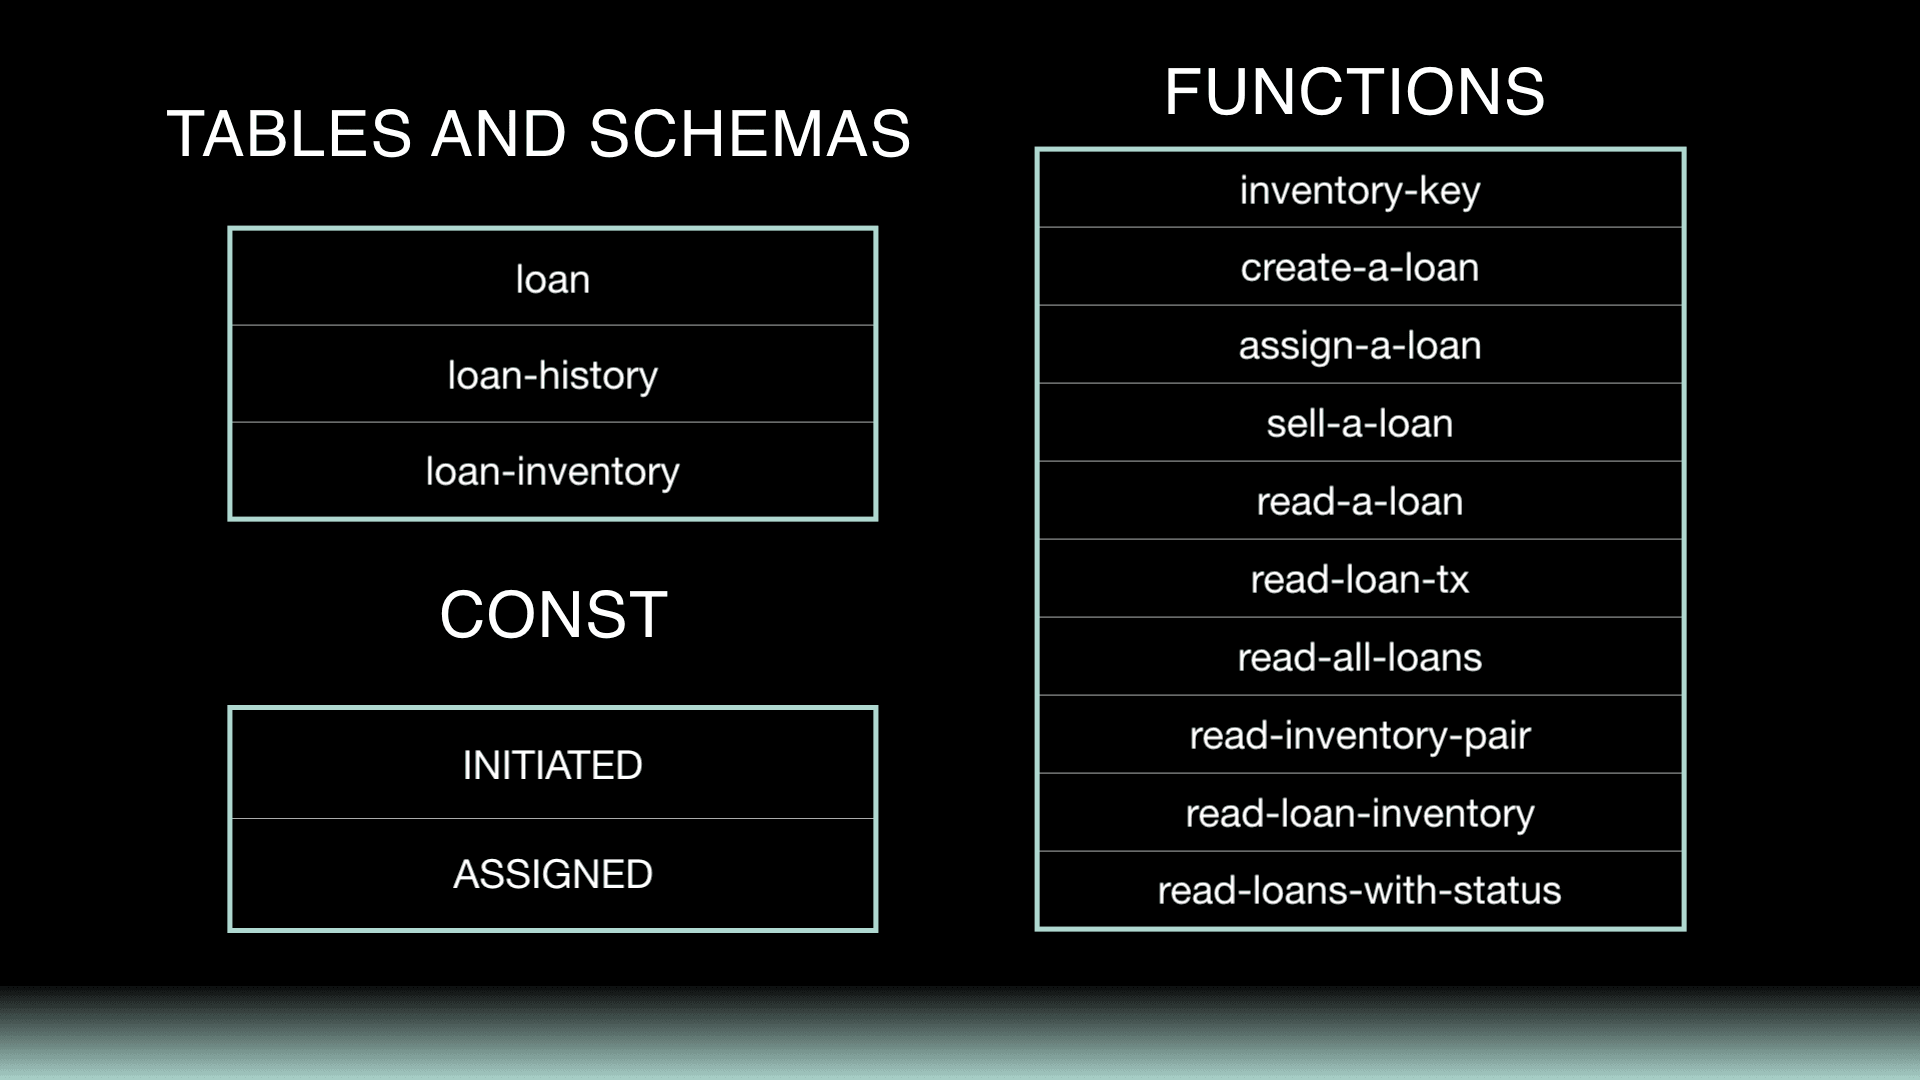
A brief overview of each feature you’ll build is provided below.

As you can see, there are many different tables, const values, and functions meant to help provide a range of functionality for your users.
There is a lot of code in this application, and it will force you to think more proactively about how to solve each problem than earlier tutorials had done. If you get stuck, try using all of the resources provided, and look to the solution for further guidance if needed.
When you’re ready, continue to the next section to start building your Loans smart contract!
Project Environment Setup
To get started, choose a project directory and clone the project resources into your local environment.
git clone https://github.com/kadena-io/pact-lang.org-code.gitgit clone https://github.com/kadena-io/pact-lang.org-code.gitChange into the loans directory to begin working on this project.
cd pact-lang.org-code/loanscd pact-lang.org-code/loansOpen this directory in atom to see each of the files provided.
atom .atom .As you’ll see, there are a few separate folders available to you.
| start | Provides a starting point with all comments for every challenge. |
| challenges | Challenges in the demo are broken out into separate files, allowing you to build your application over time while having the flexibility to experiment with your own ideas. |
| finish | Includes all comments and code for the final application. |
| loans | Includes final application without the challenge comments. |
Each of these options are meant to help support you as you work through these challenges. Feel free to use them however you’d like to.
1. Module and Keyset
The first step is to create the module and keysets for your smart contract.
If you’re unfamiliar with modules and keyset, our Pact Modules Tutorial is a great place to get started.
2. Define Schemas
The first step to build your module is to create the schema definitions for each table.
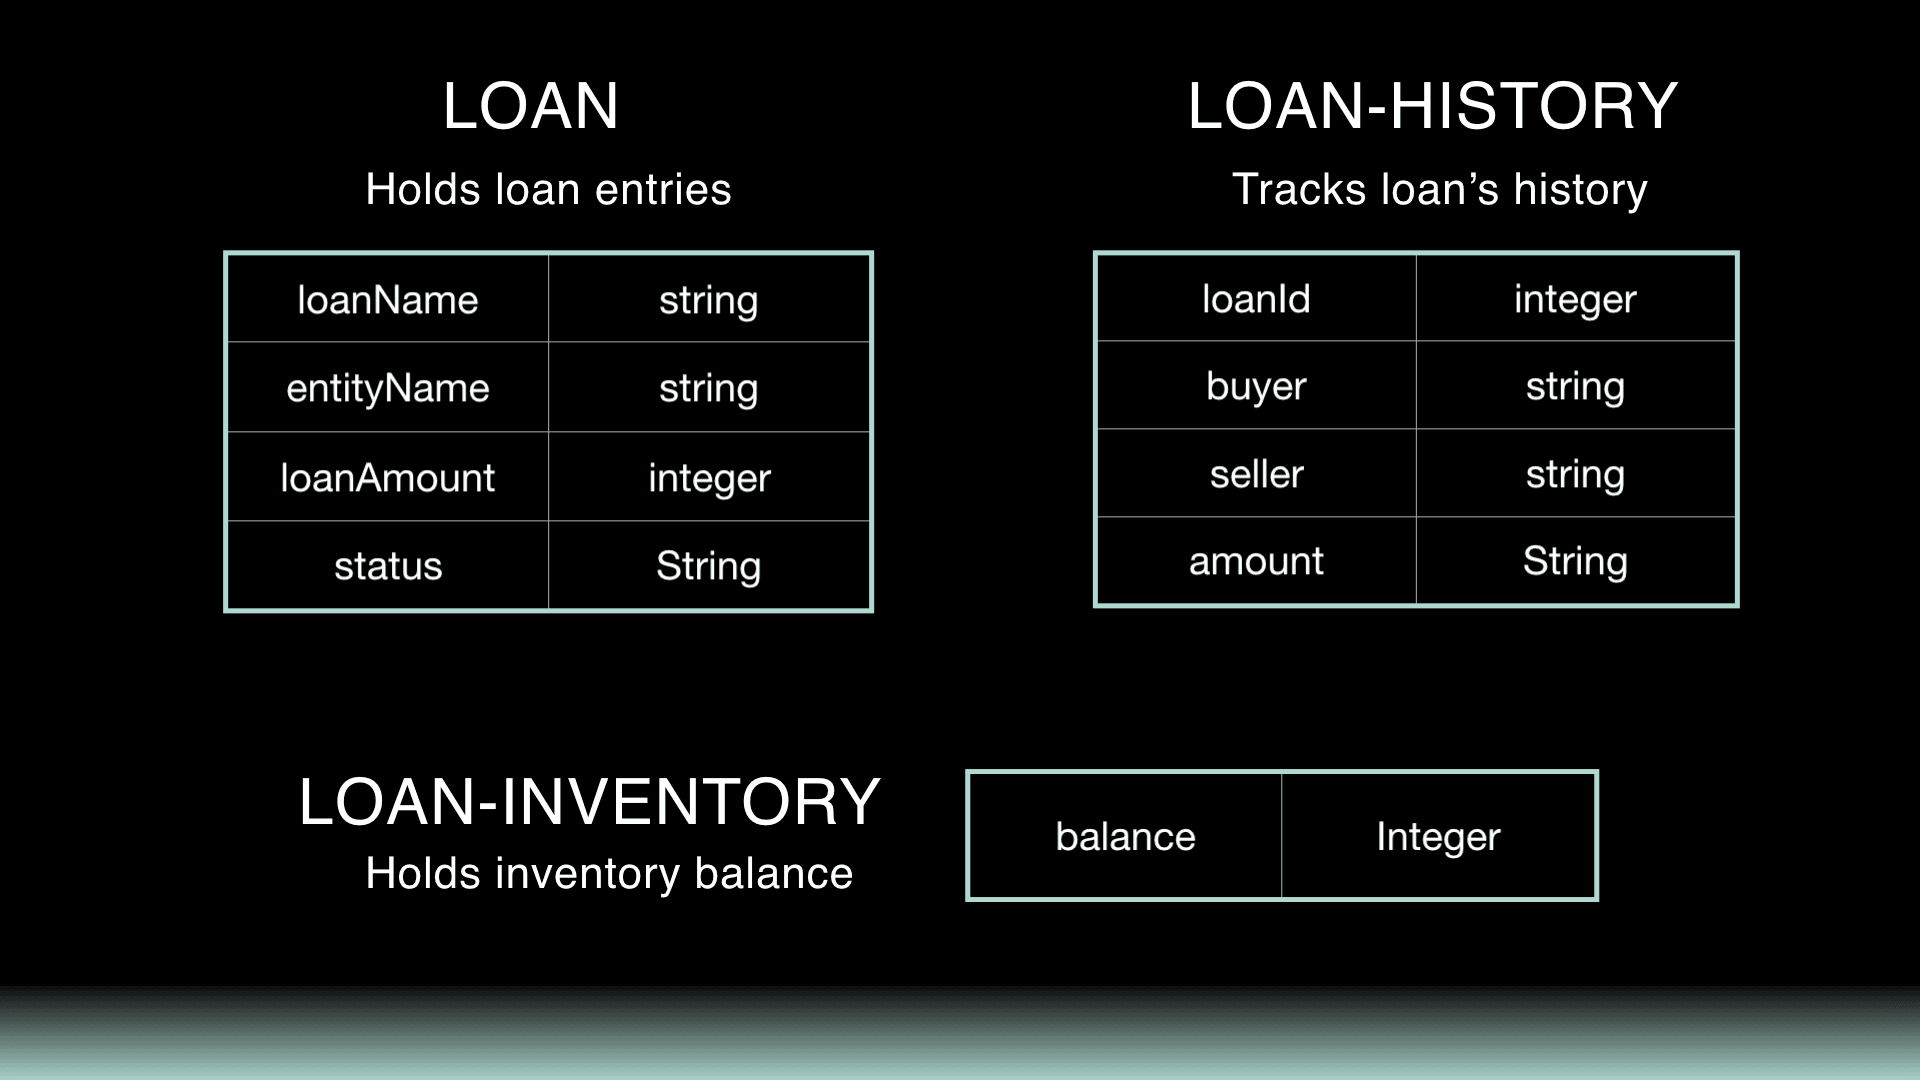
The loans smart contract will consist of 3 tables as shown below.

For this challenge, you’ll see each table presented as fields and types. Your goal is to create the schema definition for each of these tables.
Schema definitions are introduced in the Schemas and Tables Tutorial.
2.1 Loan Schema
The loan table will be used to hold loan entries.
loan table
| fieldname | fieldtype |
|---|---|
| loanName | string |
| entityName | string |
| loanAmount | integer |
| status | string |
2.2 Loan History Schema
The loan-history table will be used to track the loan’s histories. It includes each of the field names and field types shown below.
loan-history table
| fieldname | fieldtype |
|---|---|
| loanId | string |
| buyer | string |
| seller | string |
| amount | integer |
2.3 Loan Inventory Schema
The loan-inventory table will be used to hold inventory balance.
loan-inventory table
| fieldname | fieldtype |
|---|---|
| balance | integer |
3. Define Tables
Having defined each of the schemas for each table in your smart contract, you are now ready to define the tables.
Table definitions are covered in the Pact Schemas and Tables Tutorial.
4. Define Consts
The loans smart contract contains a few const values that will be used to pass values into functions and tables.
The purpose of each of these constants will be more clear as you begin integrating them into functionality of your contract using functions. For now, complete the challenge to define the constants within your smart contract.
Constant definitions are covered in the documentation here.
5. Functions
When working with tables, there are four useful types of functions that you’ll be using in your smart contract.
| type | purpose |
|---|---|
| Utility Functions | Perform routine operations callable by other functions. |
| Insert Functions | Insert new rows into a table. |
| Update Functions | Update values within a table. |
| Read Functions | Read values from a table. |
The functions you’ll create in the loans smart contract will use combinations of these built in functions to insert, update, and read data from the tables in your smart contract.
You can review each of these function types in the Pact Schemas and Tables Tutorial.
Utility Functions
Your first function will be a utility function meant to help combine the parameters into an inventory key.
5.1 Inventory-key
The reason for starting with this function is so that you can use it as a tool as you progress through other functions in the smart contract.
Hint
Try using the format function to combine inputs into a string.
Insert and Update Functions
The following 3 functions use a combination of read, insert, and update to add and update data in each of the tables you created. These functions will allow your users to accomplish important tasks like creating a loan, assigning a loan, and selling a loan.
5.2 Create-a-loan
First, you’ll need to create a function to create a loan.
Creating a loan can be done by populating specific columns with the appropriate loan data. Take a look at the tables below to see each of the columns that you will insert data into.
loans-table
| column-name | value |
|---|---|
| loanName | loanName |
| entityName | entityName |
| loanAmount | loanAmount |
| Status | INITIATED |
loan-inventory-table
| column-name | value |
|---|---|
| balance | loanAmount |
5.3 Assign-a-loan
Now that you can create a loan, it is important to be able to assign that loan to a specific entity when needed.
To do that, you will both collect data from inputs and read existing data from tables. Using the combination of this data, you can then assign a loan and update the appropriate data.
For the loans-table, you will need to both read and update data using the correct built-in functions.
loans-table
| column | function | source |
|---|---|---|
| “entityName”:= entityName | read | loans-table |
| “loanAmount”:= issuerBalance | read | loans-table |
| “status”: ASSIGNED | update | loanId |
For the loan-history-table, you will need to insert data from inputs and data that is read from other tables.
loan-history-table
| column | function | source |
|---|---|---|
| “loanId”: loanId | insert | input |
| “buyer”: buyer | insert | input |
| “seller”: entityName | insert | loans-table |
| “amount”: amount | insert | input |
The loan-inventory-table will have new data added and updated as needed.
loan-inventory-table
| column | function | source |
|---|---|---|
| “balance”: amount | insert | inventory-key |
| “balance”: (- issuerBalance amount) | update | inventory-key |
Hint
Break up the needs of each table into separate functions. This will help you read, insert, and update data in the appropriate order.
5.4 Sell-a-loan
The goal of the next function is similar to allow users to sell a loan. This function create a new row in the loan-history-table. This time, there is no table provided to help guide you. Try creating one for yourself if it is useful or follow the comments to complete the challenge.
Hint
Consult the documentation and Schema and Tables tutorial for guidance on built-in functions like bind, insert, with-read, and others.
Read Functions
The next set of functions will allow you to read important information from the tables you created. These functions are much shorter than previous functions and the comments within the challenge files are hopefully enough to get you started.
5.5 read-a-loan
5.6 read-loan-tx
5.7 read-all-loans
5.8 read-inventory-pair
5.9 read-loan-inventory
5.10 read-loans-with-status
6. Create Tables
Earlier in the smart contract, you defined 3 schemas and tables. Now that the module is complete, you are ready to move outside of the module to create each of these tables.
Table creation is covered in the Tables and Schemas Tutorial.
Deploy the Smart Contract
Congratulations, at this point you have completed the Loans smart contract!
If you’d like, you can try deploying this smart contract. You can deploy this contract using the Pact Onine Editor or from the Pact Atom SDK. If you choose to deploy this locally, you’ll need the REPL file which you can find inside of the repository you cloned.
For help getting started and deploying in each of these environments, try the following tutorials.
Review
That wraps up this tutorial on the Loans app.
By completing this tutorial, you’ve mastered many of the core ideas surrounding modules, schemas, tables, and functions, to tackle unfamiliar problems in new ways. Not only that, you’ve put each of these ideas into practice to create a smart contract that solves a very complex real world problem.
The same ideas you learned here can be applied to many other industries. Having the ability to create tables and manipulate data to create useful applications encompasses everything it means to build the back end of a blockchain application using Pact.